Facebook ad setup: from zero to your first live ad
The setup order for a first Facebook ad is: pick the objective, name the campaign, configure the ad set (budget, audience, placements), configure the ad (select the Page, upload creative, write copy, paste the link), then publish for review. For a first run, use the traffic objective, a $5 daily budget, and let the system decide placements.
Step by step, with a suggested value for every field. Follow it and your first ad is in review within half an hour.
Most advertising tutorials start at "pick your objective", but what actually stops beginners happens earlier. So this guide assumes you already have a dedicated Page, a BM, and an ad account with a payment method attached. Missing any of the three, go fill the gap in the complete guide first.
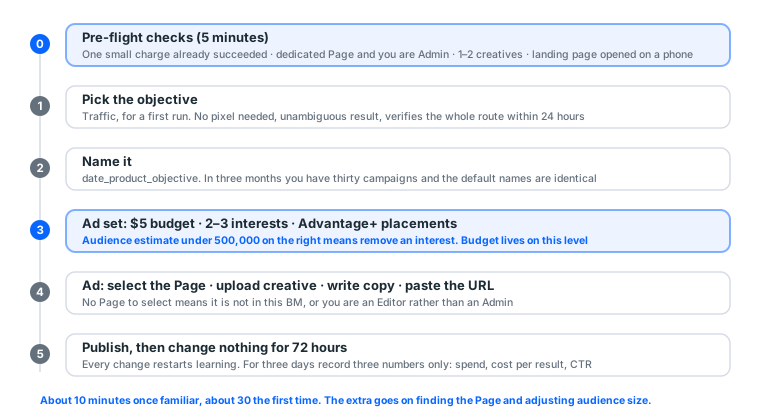
Step 0: five minutes of checks before you start
- The ad account has successfully taken one small charge (if not, attach a card and confirm)
- The Page is dedicated, not your brand Page
- You are its Admin, not an Editor or Moderator
- No restriction banners on the account
- One or two creative sets prepared (a batch of rejections raises your rejection rate)
- The landing page opens normally and looks right on a phone
The last one is skipped most often. Ad review actually opens your link, and a page that will not load or 404s means outright rejection.
Why each item matters
| Check | Cost of skipping it |
|---|---|
| One charge succeeded | The card never actually attached, discovered after publishing |
| Dedicated Page | An ad account problem reaches your brand Page |
| Admin on the Page | It is not in the dropdown, and you stall at the last step |
| No restriction banners | An account-level problem makes everything else pointless |
| Only 1–2 creatives | A batch of rejections leaves an ugly rejection rate |
| Landing page works on mobile | Straight rejection, and the reason will not mention the landing page |
The fastest way to run these five minutes
Open two tabs. One on Business Settings at business.facebook.com, confirming the Page is listed and your role is Admin. The other with your landing page open on a phone, checking the layout.
The remaining items are one glance each at the ad account's payment settings and its Account Quality page. Under five minutes total, and what it saves is the frustration of reaching the final step and finding a piece missing.
Step 1: pick the objective
Open facebook.com/adsmanager and hit Create.
| Objective | When | Beginner |
|---|---|---|
| Traffic | Sending people to a site | ✅ Use this first |
| Engagement | Post likes, comments, shares | ✅ Fine for creative tests |
| Leads | Collecting contact details | Needs a form or a pixel |
| Sales | E-commerce purchases | Requires an installed pixel with accumulated events |
| Awareness | Brand exposure | Not for beginners; hard to evaluate |
| App promotion | App installs | Needs an app and SDK |
Why traffic first: no pixel required, an unambiguous result (clicks), low cost, and it confirms the whole route fastest.
What choosing wrong actually costs
Not "slightly worse results". A different thing entirely.
You sell a $30 product and pick engagement. The system faithfully finds people who love liking and commenting, and that group overlaps poorly with people who reach for a card. A week later: beautiful engagement numbers, very low cost per engagement, zero orders.
The same product on traffic finds people who click links. You at least get real landing page traffic, so you can read bounce rate, time on page and add-to-cart rate, which tell you whether the problem is the ad or the product page.
The objective decides who the system goes looking for. It is very obedient, so ask for the right thing.
When you should switch to a conversion objective
Only when all three are true:
- The pixel is installed and verified as actually firing (use Meta's Pixel Helper extension)
- It has accumulated events over a period
- Your traffic ad is running steadily and you know roughly what the landing page converts at
Reverse that order and you are debugging three things at once, the ad, the pixel and the landing page, with no way to tell which broke.
Step 2: naming
Build the habit now and you will thank yourself in three months:
Campaign: 2026-08_starterpack_traffic
Ad set:   UK_25-45_interest-ads
Ad:       imgA_headline1
Why the variable belongs in the name
Because reports sort by name.
With the variable in the name, one look at the report tells you image A beat image B. With names like "Ad 1" and "Ad 2", you click into each one every time to remember which is which.
Suggested formats per level:
| Level | Format | Example |
|---|---|---|
| Campaign | date_product_objective |
2026-08_bottle_traffic |
| Ad set | region_age_audience |
UK_25-45_camping |
| Ad | creative_copy-version |
imgA_headline1 |
One of the highest-return minutes in the whole process.
Step 3: ad set (this level decides how much, and to whom)
Budget and schedule
- Daily budget: $5 on a first run, or the local equivalent
- Schedule: no end date at first; manual control is easier to judge
- 🔴 Budget goes on this level, not on the ad
Set the start time to tomorrow, not "now". You may still adjust creative, and edits to an ad that has already started restart the learning phase.
Audience
| Field | Beginner setting |
|---|---|
| Location | The one you actually sell to, never worldwide |
| Age | Start 25–45, narrow later based on data |
| Gender | All, unless the product is inherently gendered |
| Detailed targeting | Two or three interests only; stacking makes it narrow and expensive |
| Languages | Leave empty unless you serve only one |
Do not start with a very narrow audience. Too small means the learning phase never finishes and cost stays elevated.
How to read the audience size estimate
The right side shows a live estimate. That number matters more than you would think:
| Estimated size | Verdict | What to do |
|---|---|---|
| Under 500,000 | Too narrow | Remove an interest, or widen the age range |
| 500,000 to 20 million | Reasonable | Fine to run |
| Over 20 million | Broad | Add an interest, or narrow the location |
Too narrow is a worse problem than too broad. Too broad is only slightly less efficient and the system converges over time. Too narrow means it never finishes learning, and cost never comes down.
How to choose interests
The classic beginner error is adding every interest that seems related. That slices the audience into something narrow and expensive.
The right approach:
- Think about what your customers pay attention to normally (not "words related to my product")
- Pick the two or three most direct
- Watch the size estimate; too narrow, drop one
Example: you sell camping gear. "Camping" is right. "Outdoor activities" is too broad. Brand names like "Coleman" and "Snow Peak" are precise but possibly too narrow. The combination lands at "camping + hiking + outdoor equipment", then you adjust by the estimate.
Placements
Choose Advantage+ placements and let the system decide. Restricting placements manually shrinks what it can learn from, and you should not do that on a first run.
Watch your aspect ratio: Advantage+ puts your image everywhere. 1080×1350 portrait works in both feed and Stories; 1080×1080 is the most universal. Upload only landscape and Stories crops it badly.
Step 4: ad (this level decides what they see)
Select the Page ← where most people get stuck
No Page in the dropdown means one of two things:
- The Page is not in this BM
- You are an Editor or Moderator on it, not an Admin
Go to Business Settings at business.facebook.com. Meta ads must publish as a Page. Hard requirement, not an upsell.
Creative
| Placement | Recommended | Ratio |
|---|---|---|
| Feed (most universal) | 1080 × 1080 | 1:1 |
| Feed (portrait, more screen space) | 1080 × 1350 | 4:5 |
| Stories / Reels | 1080 × 1920 | 9:16 |
- Video: under 15 seconds, with something in the first 3
- Keep image text light. The hard 20% rule is gone; heavy text still affects delivery. Under about a fifth of the frame is the safe practice
Copy
| Field | Suggestion |
|---|---|
| Primary text | Make the point in the first two lines (phones truncate) |
| Headline | Under about 25 characters |
| Description | Can be empty |
| Call to action | "Learn More" is the safest |
| URL | Paste it, then open it on your own phone |
How to write the first two lines
Phones collapse the copy after roughly two lines and show "See more". People who did not read the first two lines never expand it, so those two lines decide everything.
Three openings that hold up in practice:
| Approach | Example |
|---|---|
| Name the audience and the problem | "The three things camping beginners buy wrong" |
| Name the result | "A tent one person can carry. 1.8 kilograms." |
| Name the price or the terms | "Free shipping over $60 this week, tent and sleeping bag included" |
Openings that do not work: starting with the brand story, building up from "have you ever...", or two lines carrying only emotion and no information. Those work in long copy. In the first two lines they are wasted.
Tracking
Select your pixel here if you have one. Skip it otherwise; a first run does not need it.
Step 5: publishing and review
Hit Publish and it enters review. Usually minutes to a few hours.
| Status | Meaning | What to do |
|---|---|---|
| In review | Normal | Wait |
| Active | Approved and running | Normal |
| Scheduled | Approved, start time not reached | Check the schedule date |
| Rejected | Not approved | Read the reason, fix that, resubmit |
| Not delivering | Approved but not spending | Check audience size and bid |
| Still in review past 24 hours | Usually an account-level problem | Check Account Quality |
Translating rejection reasons
The platform's wording is vague. Here is what it usually means:
| What it says | Usually means |
|---|---|
| Does not comply with advertising policies | Landing page will not open, or the creative overclaims |
| Personal health and appearance | Copy targets the reader's body |
| Misleading claims | Earnings or efficacy promises, "guaranteed", "100%" |
| Intellectual property | Someone else's brand name, logo or a celebrity photo |
| Low quality or disruptive content | Landing page heavy with ads, pop-ups, auto-downloads |
The order to handle a rejection
- Read which category the reason names
- Fix that one thing, not the whole set
- Resubmit the same ad, do not duplicate it into a new one (that accumulates rejection records)
- Same creative rejected twice in a row: change the creative, stop appealing
Telling creative from account: submit the same creative on another ad account. Rejected on both means creative. Rejected on one means that account.
Step 6: for 72 hours after launch, do one thing
Change nothing.
Ads need a learning phase to stabilise. Changing budget, audience or creative on day one restarts learning every time, and cost never comes down.
What restarts learning
| Action | Restarts it |
|---|---|
| Large budget change (past 50%) | ✅ |
| Audience change | ✅ |
| Placement change | ✅ |
| Optimisation event change | ✅ |
| Pausing and resuming | ✅ |
| Creative swap | 🟡 Smaller effect |
| Renaming the ad | ❌ |
Pausing and resuming restarts it, and almost nobody knows this. People switch ads off at the weekend to save money, switch them back on Monday, then complain that cost went up.
The first seven days
| Day | Do | Do not |
|---|---|---|
| D1 | Confirm status turned Active | Change any setting |
| D2 | Record three numbers | Same |
| D3 | Record three numbers | Same |
| D4 | First judgement: is cost acceptable | Change five things at once |
| D5–D6 | If you changed creative, observe | Change the audience too |
| D7 | Decide about raising budget | Raise by more than 50% |
The three numbers: amount spent, cost per result, link CTR.
How to make day 4's judgement
Three days done, roughly $15 spent. Calculate one number:
Cost per link click = total spend ÷ total link clicks
| This number | Means | Next |
|---|---|---|
| Within a range you can live with | The route works | Raise budget along the gradual scaling curve |
| Clearly too high | Creative or audience is off | Change the creative first, not the audience |
| Spend stuck at zero | Audience too narrow, or still in review | Recheck audience size and delivery status |
| Ad rejected | Landing page or creative crossed a line | Read the rejection reason |
Why creative before audience. Creative moves CTR far more than small audience adjustments, and CTR sits in the denominator of the cost formula, so changing it has the most direct effect. It also disturbs learning less than an audience edit.
How to read every cost metric: how Facebook ad costs work.
Step 7: preparing creative
Sizes were above; this is about content. Creative is the one variable a more expensive account cannot rescue, so it gets its own section.
How many sets for a first run
One or two. Not three, and not ten.
Two reasons:
- New accounts get stricter review, and a batch of rejections leaves an ugly rejection rate, which feeds into later delivery
- Your budget is $5, and split ten ways none of them produces meaningful data
What one creative set contains
| Component | Count | Note |
|---|---|---|
| Main visual | 1 image or 1 video | 1080×1350 is the most versatile |
| Primary text | 1 block | The point in the first two lines |
| Headline | 1 line | Under about 25 characters |
| Call to action | 1 | "Learn More" is the safest |
Two sets should differ by exactly one variable, usually the main visual. Copy, headline and button identical, so you know the difference came from the image.
What the main visual should show
The most common beginner image is a product shot with a lot of text on it. That fails twice: heavy text affects delivery, and it is illegible on a phone.
Three that hold up in practice:
| Type | Suits | Watch out for |
|---|---|---|
| Product in context | Physical goods | The use case must be visible; not a white-background product shot |
| Before and after | Results-based offers | Policy risk; never imply medical effect or target body characteristics |
| One number or one short line | Services, courses | Text large enough to read on a phone at a glance |
The shared principle: at thumbnail size on a phone, it should still be obvious what this is about. Shrink the image to 200 pixels wide and look. If you cannot tell, remake it.
The three-second rule for video
Using video means something has to happen in the first 3 seconds. People scroll fast, and without a reason to stop in those three seconds, nothing after it gets seen.
What belongs in those three seconds: the subject, the problem, or a visual surprise. What does not: a brand logo animation, a slow establishing shot, silence before the captions start.
When to change creative
Watch CTR, not the calendar.
A sustained decline in CTR is the signal. Some creative fatigues in two weeks, some holds for a month, and it tracks audience size: the smaller the audience, the more times the same person sees it, and the faster it fatigues.
That matters more in smaller-language markets, where reachable numbers have a hard ceiling and fatigue arrives sooner than in the US.
Step 8: preparing the landing page
Ad review actually opens your link, and landing page problems usually go unstated in the rejection reason. The most overlooked section here, and the biggest single contributor to rejections.
Five situations that get rejected outright
| Situation | Why |
|---|---|
| Will not load, 404s, or takes more than ten-odd seconds | Review cannot open it, so it is rejected |
| Mobile layout broken enough that the offer is unclear | Review looks at it on a mobile device |
| Content is about something different from the ad copy | Judged misleading |
| The page makes claims the ad copy did not | Same |
| Pop-ups, auto-downloads, heavy advertising | Low quality content |
The one thing to do after pasting the URL
Open it on your own phone.
Not on your computer. Take out a phone and open it on mobile data, not Wi-Fi. That one second saves half a day of debugging, because:
- A page that looks fine on a computer may break on a phone
- A page that is fast on Wi-Fi may be slow enough on mobile data to time out review
- Your own device has a cache, so a first-time visitor is slower than you
Conversion rate is a multiplier, not an addition
Back to the cost formula:
Cost per result = CPM ÷ 1000 ÷ CTR ÷ conversion rate
Conversion rate sits in the denominator, so like CTR it multiplies. Taking a landing page from 2% to 3% has the same effect as cutting ad cost by a third.
Plenty of people spend hours adjusting ads without spending ten minutes looking at their landing page on a phone. That is a mismatch of return on effort.
The minimum landing page checklist
- What you are selling is clear within three seconds on a phone
- The price is visible without a long scroll
- The buy or submit button is on or near the first screen
- No pop-ups
- As few form fields as possible
- The content is about the same thing as the ad copy
Step 9: when to install the pixel and how to verify it
A first ad does not need a pixel, but you will eventually. This covers timing and verification.
When to install it
After your traffic ad is running steadily. Because handling ad, pixel and landing page simultaneously means you cannot tell which one broke.
The correct order:
- Run the route through on a traffic objective (confirm charges, review approval, landing page)
- Install the pixel and verify it fires
- Let it accumulate events over a period
- Then switch to a conversion objective
The pixel belongs to the BM, not the ad account
Important, and it works in your favour.
Because the pixel belongs to the BM, when an ad account gets disabled and you move to another, the pixel and every event it accumulated are still there, and the new account picks up where the old one stopped.
Run a personal-level ad account with the pixel bound to it and losing the account loses the pixel too. You start accumulating conversion data from zero, and that cost is usually far higher than the account itself.
See the pixel section in what is Business Manager.
Always verify after installing
Do not skip this. Installed-but-not-firing is very common, and without verifying, you find out a week into a campaign with no conversion data.
How: install Meta's Pixel Helper browser extension, open your landing page, and see whether it detects the event.
Three things to confirm:
| Check | Normal |
|---|---|
| Base event (PageView) | Fires on every page |
| Key events (AddToCart, Purchase) | Fire when you actually perform the action |
| No double firing | One action counts once |
The third is the most overlooked. A pixel installed twice, for instance in both the site source and a tag manager, doubles your event count, and you conclude your conversion rate is excellent.
One thing hosted-platform users hit
If your site runs on a hosted e-commerce platform, the pixel usually has a dedicated field in the admin and you do not need to edit source code.
Before filling it, confirm whether the field wants the pixel ID or the complete tracking code. The wrong format silently fails to install, with no error message.
Common problems, quick lookup
| Symptom | Usually |
|---|---|
| No Publish button | No usable Page |
| The Page is in the dropdown but selecting it says insufficient permission | You are an Editor, not an Admin |
| Ads keep being rejected | Landing page will not open, or creative and copy crossed a policy line |
| Spend is zero | Audience too narrow, bid too low, or still in review |
| Cost suddenly doubled | A new auction environment; observe 3 days |
| Spending limit stuck | Not enough payment history; see what is an ad account |
| The image is badly cropped in Stories | You only uploaded landscape |
| Cost rose after a budget change | You reset the learning phase |
Step 10: how to run your second ad
Once the first works, a lot of people do not know what comes next, so they start fiddling with the first one. This is about the second.
The second ad has a different purpose
| First ad | Second ad | |
|---|---|---|
| Purpose | Verify the route works | Find which variable matters |
| What to test | Nothing | One variable |
| Budget | $5 | The same as the first |
| Basis for judgement | Whether money goes out | The difference between the two |
Which variable to test
Ordered by return:
One: creative (first choice). Add a second ad inside the same ad set, changing only the main visual, with copy, headline and button identical. The two audiences are then identical, so any difference came from the image.
Two: audience. Add a second ad set inside the same campaign, with identical creative, changing only the interests. Any difference then came from the audience.
Three: objective. Open a second campaign. Least used, because your objective is usually determined by your business model rather than something to test.
The common wrong approaches
Running a creative test at ad set level. Now creative differs and the audience sample differs, so when it finishes you cannot say which won. It looks like a test. Nothing was learned.
Changing two variables at once. Image changed and copy changed. A win credits nobody and a loss tells you nothing about what to fix.
Different budgets between the two. Two sets that spent different amounts are not comparable; the data volumes are too far apart.
How many days before judging
At least three, and the two should have spent similar amounts. One set at $45 and the other at $8 is not "one performed better", it is not enough data to compare.
Judge on cost per result, not CTR. Creative with high CTR and poor conversion is common; that creative is just better at baiting clicks.
When you can start scaling
Two conditions together:
- One set's cost per result is stably below your break-even
- It has run for five to seven consecutive days
Then raise budget along the gradual scaling curve: never above 50%, at least 48 hours apart.
Four settings that bite non-US advertisers
Rarely mentioned in English tutorials, and they cost real money.
① Set the time zone to where you actually operate
Locked after creation. Time zone decides when a day closes. On UTC while operating elsewhere, your "today's spend" resets at a time unrelated to your working day and you convert in your head every time.
② Keep currency consistent with your other accounts
Also locked after creation. A USD account usually adds a bank foreign transaction fee of about 1.5%, which never appears in Ads Manager, only on your card statement.
Half your accounts in one currency and half in another makes a consolidated view painful.
③ Enable overseas transactions first
Locally issued cards mostly attach, but some banks default to declining overseas e-commerce. If the first attempt fails, call the bank rather than retrying. Too many retries can get the account flagged.
The smoother order: call, confirm overseas transactions are enabled, then attach the card.
④ The ceiling on audience size
Smaller markets have a hard ceiling on reachable people, which produces two practical differences:
| Small market | Large market | |
|---|---|---|
| How fast audiences wear out | Fast | Slow |
| How often creative needs changing | Often | Less often |
| Room to "just widen the audience" | Limited | Large |
So in a smaller market you prepare creative more densely than you would for the US. The same people see you repeatedly, and fatigue arrives sooner. The practical habit: start preparing the second creative set the day the first goes live.
What this whole process costs in time
| Stage | Once familiar | First time |
|---|---|---|
| Pre-flight checks | 2 minutes | 5 minutes |
| Building one ad | About 10 minutes | About 30 minutes |
| The daily check | About 3 minutes | About 10 minutes |
| Day 4's judgement | About 15 minutes | About 30 minutes |
The slow parts on a first run are usually finding the Page and adjusting audience size. Both are fast the second time.
The five most expensive setup mistakes
All five share a property: no error message appears, and they cost you real money.
① Putting budget at campaign level (CBO on)
Symptom: one ad set barely spends and you conclude it performed badly.
Actually: the system gave the budget to another set. It did not perform badly. It never got a chance.
How to avoid it: turn CBO off on a first run and set budget at ad set level. Turn it on once you have two or three stable ads and know each set's baseline.
② Setting the audience too narrow
Symptom: spend stays far below budget, or cost stays high.
Actually: the audience is too small, so the system enters limited auctions per day, samples accumulate too slowly, and learning never finishes.
How to avoid it: watch the audience size estimate on the right of the ad set. The practical floor is 500,000.
③ Setting the start time to "now"
Symptom: you are still adjusting creative while the ad is already spending, and every adjustment resets learning.
How to avoid it: set the start time to tomorrow. Confirm every setting is right, then let it run the next day.
④ Uploading ten creative sets at once
Symptom: over half are rejected and your account's rejection rate looks bad.
Actually: new accounts get stricter review, and rejection rate feeds into later delivery.
How to avoid it: one or two at a time, adding more once they pass.
⑤ Switching ads off at the weekend
Symptom: cost is higher on Monday and you assume the market moved.
Actually: pausing and resuming resets the learning phase. Two days off a week is four resets a month.
How to avoid it: lower the budget rather than pausing. Stopping entirely also breaks your spend record, which slows the growth of your spending limit.
What these five share
None of them produces an error message. The ad runs, the report appears, and cost is simply higher than it should be with no visible reason.
Which is why "work through the checklist" beats "adjust by feel": the checklist catches all five, and feel catches none.
The parts you need
This guide assumes you already have a Page, a BM and an ad account. If you do not:
Our catalogue currently has 145 display groups, 36 of them Facebook. The relevant price bands:
| What you are missing | Groups | Price band (USDT) | Median |
|---|---|---|---|
| Page | 4 | 8 – 80 | 80 |
| BM | 2 | 10 | 10 |
| Ad account | 2 | 4 | 4 |
| Aged account | 5 | 4 – 20 | 13 |
The Page has the highest median, and it is the layer most people forget to buy. Without one, you stall at Step 4 of this guide.
Unsure which combination, start at the smallest: the first-run bundle is an aged account, a BM3 and a Page, which is everything one full run needs. At 39 USDT against 48 USDT bought separately, it saves 18.8%.
The complete setup checklist
Print it or save it, and tick each line before building any new ad.
Pre-flight (every time)
- Ad account status normal, no restriction banners
- Payment method valid, card not expired
- The Page is in the BM and I am its Admin
- One or two creative sets prepared
- Landing page opened on a phone
Campaign level
- Objective is right (traffic for a first run)
- The name carries date, product and objective
- CBO is off
Ad set level
- Daily budget $5, or your starting figure
- Start time set to tomorrow, end date empty
- Location is only where you actually sell
- Age starting at 25–45
- Only 2–3 interests
- Audience size estimate between 500,000 and 20 million
- Placements set to Advantage+
- Bid strategy set to highest volume
Ad level
- The Page selected is the dedicated one
- Creative is 1080×1350 or 1080×1080
- Image text under about a fifth of the frame
- The point is made in the first two lines of primary text
- Headline under about 25 characters
- URL pasted and opened on a phone
- Pixel selected, if you have one
After publishing
- Campaign name, ad account ID and launch time recorded
- A reminder set: change nothing for 72 hours
- A tracking sheet ready with columns for date, spend, impressions, clicks, results
That last item's value in three months is far above the ten minutes it costs now. Without a sheet you never build your own baseline, and without a baseline you can only judge by feel.
The purpose of a first ad is not revenue. It is proving the route connects. Once it does, every adjustment after that starts meaning something.
Sources (all official pages, checked 2026-09-08). Prices, catalogue distributions and warranty ratios in this article are our own catalogue and ticket data, not taken from these pages:
- Ads Manager — Meta for Business — facebook.com
- About the learning phase — Meta Business Help Centre — facebook.com
- The ad review process — Meta Business Help Centre — facebook.com
- Advertising Standards — Meta Transparency Center — transparency.meta.com
- Meta Pixel documentation — Meta for Developers — developers.facebook.com
FAQ
Which objective should my first ad use?
Traffic or engagement if you have no pixel yet. Leads and purchase conversions require an installed pixel with accumulated events, or the system has no signal to optimise on.
What daily budget should I set?
$5 for three days on a first run. The point is not results; it is proving the charge works, the creative passes review, and tracking is installed correctly.
How narrow should the audience be?
Neither very narrow nor very broad. Start with a mid-sized audience you genuinely understand: location plus age plus two or three interests is enough.
Should I choose placements myself?
No. Use Advantage+ placements on a first run. Restricting placements manually shrinks what the system can learn from.
How long does review take?
Usually minutes to a few hours. Still in review past 24 hours is normally an account-level problem rather than that one ad.
Why is my Page missing from the dropdown?
Either it is not in this BM, or you are an Editor rather than an Admin. Editor permission can publish posts but cannot run ads.
What creative size should I use?
1080x1350 if you only prepare one. It takes the most vertical space in feed and still reads when cropped to 1:1.
How much text can go on the image?
The hard 20% rule is gone, but heavy text still affects delivery. Keeping it under about a fifth of the frame is the safe practice.
How long should the copy be?
Make the point in the first two lines, because phones truncate. It can run longer after that, but people who did not read the first two lines never expand it.
How soon can I make changes?
72 hours. Every significant change restarts the learning phase, and fiddling through the first three days means cost never comes down.
What do I do about a rejection?
Read which category the reason names and fix only that, then resubmit. Do not duplicate the ad into a new one; that accumulates rejection records.
Why is spend stuck at zero?
Three usual causes: the audience is too narrow, the bid is too low to win placements, or it is still in review. Check the delivery status and the audience size estimate first.
How many creative sets should I upload?
One or two. New accounts get stricter review, and a batch of rejections makes your rejection rate look bad, which feeds into later delivery.
Should I turn on A/B testing?
Not for a first run. Once you have two or three stable ads and want to compare a variable properly, the built-in A/B test guarantees the two audiences do not overlap.
What should I watch on the landing page?
Ad review actually opens your link. A page that will not load, 404s, loads slowly, breaks on mobile, or is about something different from the ad copy all get rejected.
Want the parts this article talks about?
See the catalogRead next
Running Facebook Ads: the complete path from nothing to your first live ad
The whole route on one page. From "where is Ads Manager" to "how do I
What is Ads Manager? Full interface tour and first-time setup
Ads Manager is Meta's console for building, running and monitoring ads
How Facebook ad costs work: CPM, CPC and ROAS unpacked
Ad cost is not one number. It is a chain of ratios multiplied together
What Is BM in Facebook Ads? Business Manager, BM3 and BM50
BM is the container your ad assets live in, not the place you run ads
The gradual scaling curve from day eight
Budget is not whatever you feel like setting. Scale too fast and the s